AR Markers
Introduction
 |
 |
The eye sockets are darker than the forehead and the middle of the forehead is lighter than the side of it. If the algorithm finds enough matches in one area of the image, it concludes that there is a Face there. This is what is implemented in the Haar-cascade frontal OpenCV algorithm. But in order to augment a mask on top of the face, we need to locate the exact locations of our facial feature points. This is done using a Convolutional Neural Network model trained on a custom dataset of tens of thousands of facial images with manually marked feature points annotated with it. Based on this model, we get something that looks like this:
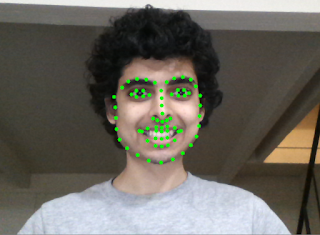 |
At an initial stage, with the 67 landmarks detected, our face looks something like this:
The figure above shows the Facial landmark detected using a pre-trained dlib model. These points are now going to be used to create a mesh overlay of the face. This can now move, scale, and rotate along with our face. This is also how the face-swap feature is created. This provides us with a set of reference points to generate the desired coordinates.
 |
Next, I figured out the size of the mask and calibrated it with the face by calculating the Face Height and width. This is done based on the landmark reference points. This step is essential for resizing the mask according to the distance between the camera and our face. The final step is to combine the two images in and produce the output that looks something like this:
 |
The project includes 10+ masks to choose from. Here are some of the examples:
 |
 |
 |
 |
The next step is to implement 3D masks that rotate and react to our Facial movements. You can find the complete project here: https://github.com/Akbonline/Snapchat-filters-OpenCV
Feel free to share, comment, and like the post if you did! You can reach out to me through my email if you have any queries: akshatbajpai.biz@gmail.com
Thanks for reading!


0 comments:
Post a Comment